Showing posts with label Mixed Media. Show all posts

Tuesday, May 8, 2012

DIY 3D Photo Frames

Photo Frames
Hi....
Today I would like to share with you the 3D Photo Frames I made with my son for
gifting his teachers on the occasion of  'Teachers Appreciation Week'  :)
We bought some blank wooden frames by Plaid.......
My son painted the frames with acrylic color- yellow.......
He did two coats of paint and, we let the frames dry for an hour......
We had also bought wooden cut-outs of a sun and a ladybird......
We glued the sun on one frame and the ladybird on the other.....
We even glued some googly eyes on the sun and the ladybird....... :D
Then my son stuck foam stickers of flowers and butterflies on the frame......
I gave it the finishing touches with 3D glitter for the butterfly trails......
And......Our Frames were ready......
My son was very happy to make such lovely frames on his own.....
And, I was so proud of him !!!
The best part was that, his teachers adored their gift as well :)

Sun Photo Frame
Ladybird Photo Frame
You can leave a comment here to let me know if you liked the 3D Photo Frames.......


Thursday, April 26, 2012

"Happy Home"- 3D Key Holder

3D Key Holder

Hi....This is another key holder commission piece I made a few days back......
This is a 3D key Holder and I call it "Happy Home"......
I made this design on a Wooden Ply 4"x7", using epoxy / M-seal.....
The details on how to make this can be found in my earlier post: 
I think it turned out pretty cute.....What do you think ???
Do leave a comment to let me know how you feel about it ....
Have Fun :)
And Thanks for Visiting .....


Thursday, April 5, 2012

"Under the sea"- 3D Key holder

3D Key Holder


Hi and welcome to my post on how I made this "Under the Sea" key holder....
This was a completely hand-moulded, made-to-order piece for my cousin......
I used a wooden piece 3x6" in size, as the base for this key holder.....
I painted the base with acrylic colors in shades of blue and left it to dry.......
Then I hand-moulded epoxy to make the fishes, shells, plants, turtle, octopus, starfish and 
the bubbles.......
After arranging the creatures and the foliage, I moulded some epoxy pebbles for the 
base and some epoxy borders for the top corners......
Then came the fun part.....coloring !!!
I used bright acrylic colors for all the creatures....I wanted them to look happy!!
Then I added some 3D glitter for the waves and the design was complete.....
Lastly I added some hooks to hang the keys....after all thats what it was for ;)
It turned out pretty cute, and my cousin absolutely loved it !!!
Thank you for reading, and do let me know if you liked it .... :)


Saturday, March 10, 2012

Bride on a Box !!!

Bride on a Box


Hi and welcome again....
Today i would like to share with you how i made this bride on a jewellery box ....
Actually this was a wooden perfume box that i upscaled into a jewellery box and gifted it to my sister during her wedding...this was part of her "Rukhwat" or the bridal display of gifts from the mother's side....
The theme blended quite well with her wedding.....
First i sanded the box to make it smooth and then painted it all over with acrylic color- black....Then i got out my pack of air drying clay and started moulding the bride part by part over the box itself...When she was complete, i left her to dry for a day......I was too tired after all the effort, so while she rested i rested too!!
Next day, with renewed zeal i got back to work on the bride again.....I wanted the bride to look happy, so i chose all the bright acrylic colors for her clothes.....I painted her part by part and let her dry for a few hours....Then i took out my 3d outliners and gave detailing to her outfit....Finally i painted her face, hands and feet and gave facial features for that smiling bridal face.....This coy and dressed up bride sure made my sis smile!!!
Last but not the least i put a satin lining inside the box to make soft interiors....After all the box was meant to store jewelry!!


Tuesday, March 6, 2012

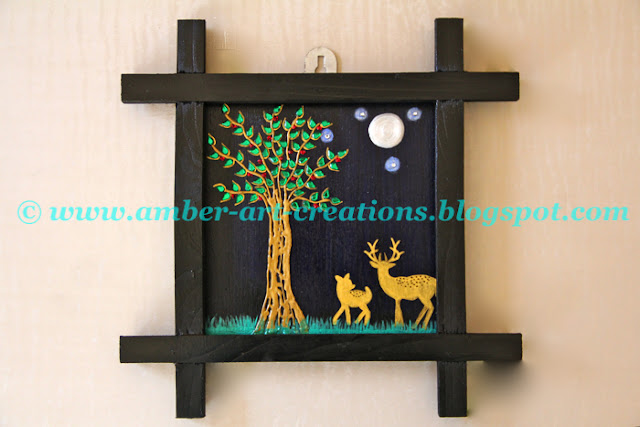
DIY Artsy Mixed Media - Deer Family

Mixed Media
Hi, today i'll show you the artwork i created for a friend, for her housewarming. 
This is mixed media on a wooden ply 6 inches by 6 inches in a wooden frame.


Deer Family
 I started by painting the wooden frame with acrylic color- black and kept it to dry.......
In the meanwhile, i sanded the base and painted it with acrylic colors- blue and black.
I made the tree with 3D outliner- gold and the leaves with rhinestones .
Last i painted the deer silhouettes with acrylic color- gold.
The last step was to assemble the base in the frame and voila!! a beautiful piece was ready to gift....
I just loved the way it turned out and my friend loved it too!!!
You can leave a comment below to let me know if you liked it too.....
I can also make this for a custom order....
Email me at amber.art2012@gmail.com if you want one :)
Thanks for visiting and come back soon for more!!!